Here you see very good and exciting project speech recognized intelligent robot. Implementing robotics is nothing but encouraging automation. Robots are known to perform tasks automatically along with the knowledge of human intervention as for initial programming and instructions given to them should be in accordance to the requirement of the users.
Controlling a robot has been a concern for many, as it requires expertise. But this is not possible all the time. These robots are controlled using computers or remote controllers which is tedious and time consuming to learn. Hence it is the need of the hour to develop new techniques to control these robots for variety of purposes.
In modern era, the Speech Recognition mechanism has wide applications in the field of automation. It performs the specified sequence of operations with the same accuracy. Speech Recognition is an important asset for a robot, increasing its ability to interact with human beings and above all using their most natural form of communication.
In this project, the major role is being played by the Arduino. It is an open source electronics platform based on easy-to-use hardware and software. It consists of a physical programmable circuit board often referred as a microcontroller and a piece of software that runs on a computer used to write and upload computer code to the physical board.
Arduino is a device in which electronic modules can be interfaced. Specifically for this project a Bluetooth module, Servo motors, SD Card module and Audio Speaker module has been interfaced for the transmission and reception of data between the user and the robot.
Finally, for the purpose of communication between the user and the robot, an android app has been developed using MIT App Inventor. The app will be connected with the robot through Bluetooth and through this app the robot will communicate as instructed by the users
Hardware Requirements:
- Arduino Uno R3ATmega328P
- Servo motor (Actuator)
- Bluetooth module (HC-05)
- Audio Speaker module
- L293D Motor Control Shield
Arduino UNO R3:
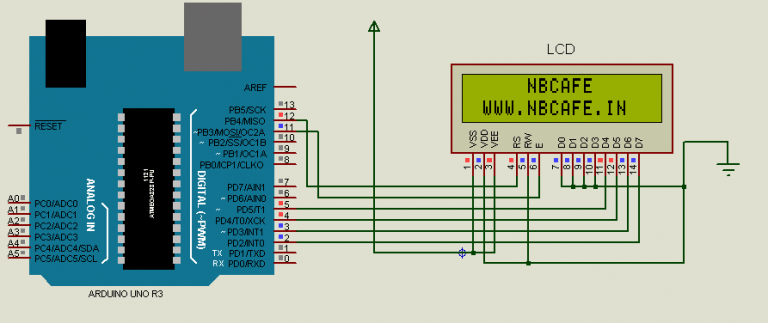
The Arduino Uno is a microcontroller board based on the ATmega328P. It has 14 digital input/output pins (of which 6 can be used as PWM outputs), 6 analog inputs, a 16 MHz ceramic resonator, a USB connection, a power jack, an ICSP header, and a reset button. It contains everything needed to support the microcontroller; simply connect it to a computer with a USB cable or power it with a AC-to-DC adapter or battery to get started.

Servo motor:
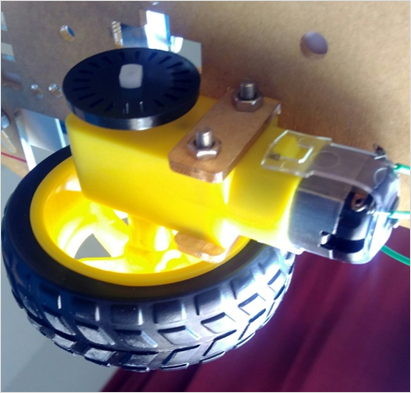
Servo motors are a type of electromechanical actuators that do not rotate continuously like DC/AC or stepper motors; rather, they are used to position and hold some object. They are used where continuous rotation is not required so they are not used to drive wheels (unless a servo is modified). In contrast they are used where something is needed to move to particular position and then stopped and hold there. And we use this as a Robo-Wheel.
Bluetooth Module:
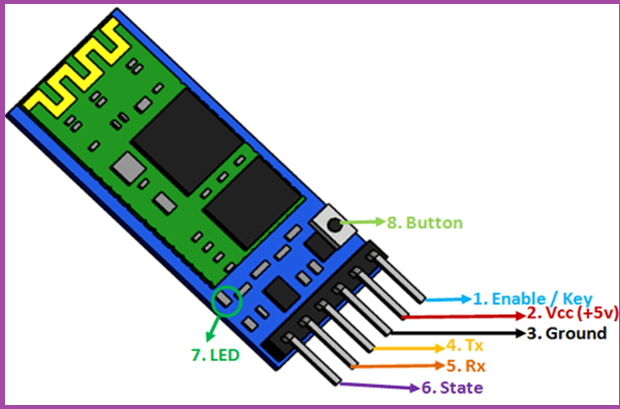
To communicate smartphone with HC-05 Bluetooth module, smartphone requires Bluetooth terminal application for transmitting and receiving data. Bluetooth terminal applications can be found for android and windows in respective app store. So, when it is required to communicate through smartphone with HC-05 Bluetooth module, this HC-05 module is connected to the PC via serial to USB converter. Before establishing communication between two Bluetooth devices, it is first needed to pair HC-05 module to smartphone for communication.
SD Card Module:
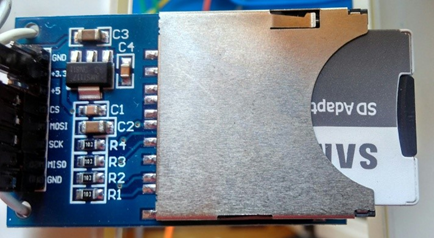
The Arduino can create a file in an SD card to write and save data using the SD library, there are different models from different suppliers, but they all work in a similar way, using the SPI communication protocol. The module used in this tutorial is the one shown in figure below (front and back view). To store the voice instructions and the corresponding output we have used the SD Card module. Here, all the data will be stored as a database. Whenever, an instruction is passed through the Bluetooth module, a key is generated. This key will check for the corresponding output. In case no output is found, an error is generated.
Speaker Module:
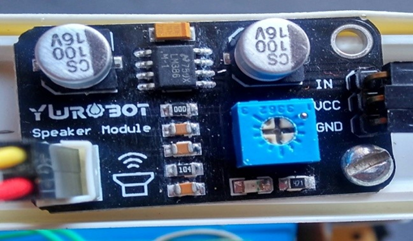
Speaker module is used to interface the speaker with the Arduino board. So that, it can give expected output as voice. YUROBOT speaker module has got 3 pins in it. VCC, GND, IN. VCC and GND pins will be connected to the corresponding pins of the Arduino. If any command appears which is related to the speaker module, the Arduino will let the speaker to output the corresponding voice, which is already stored.
L293D Motor Control Shield:
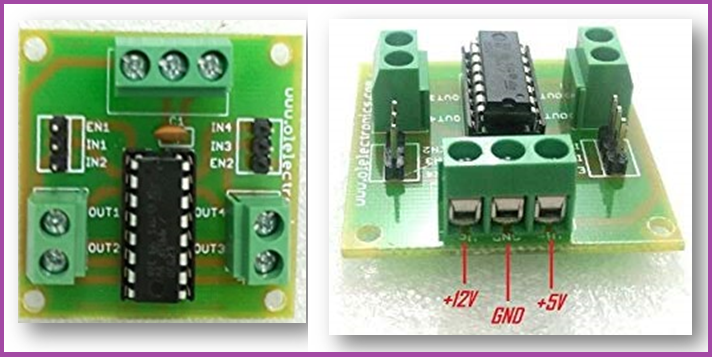
L293D is a monolithic integrated, high voltage, high current, 4-channel driver. Basically this means using this chip you can drive DC motors with power supplier up to 36 Volts, and the chip can supply a maximum current of 600mAper channel. L293D chip is also known as a type of H-Bridge. The H-Bridgeis typically an electrical circuit that enables a voltage to be applied across aload in either direction to an output, e.g. motor
Software Implementation
- Arduino IDE
- Android App
Arduino IDE:
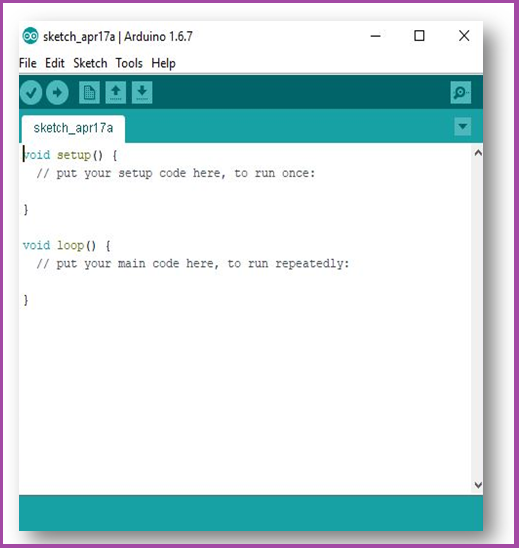
The open-source Arduino Software (IDE) makes it easy to write code and upload it to the board. It runs on Windows, Mac OS X, and Linux. The environment is written in java and based on Processing and other open-source software.
Android App:

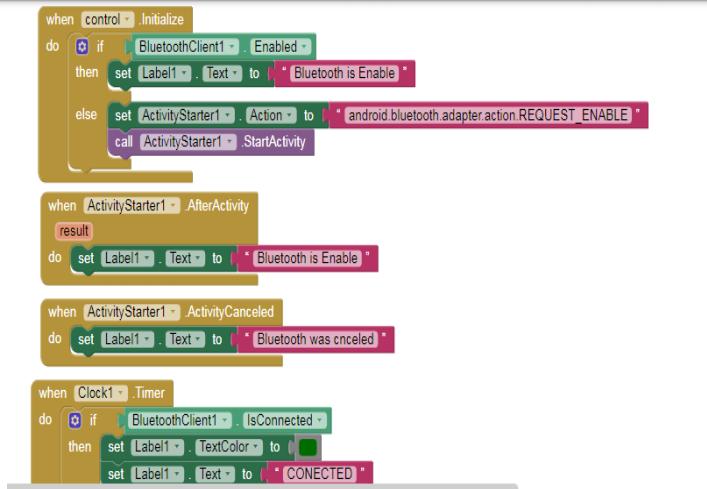
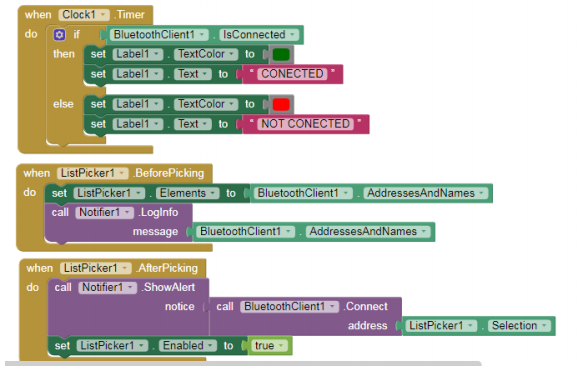
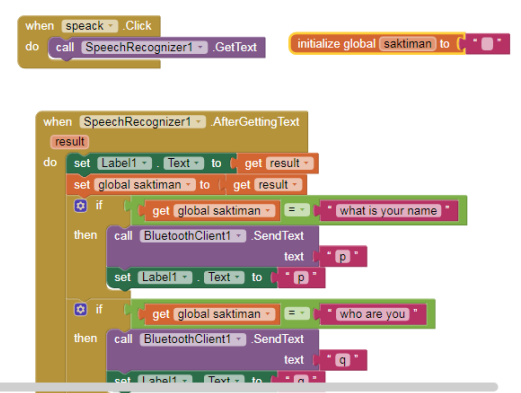
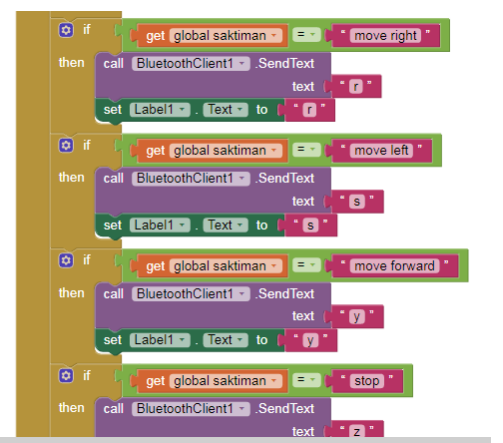
The Android application has been made using MIT app Inventor. This application has been developed for the purpose of communication and also for understanding of instructions given by the users to the robot. The MIT app Inventor is a totally different platform for app development as compared to other app development platforms. Instead of writing a lengthy code, some code blocks are used which is easier for app developers to create apps.
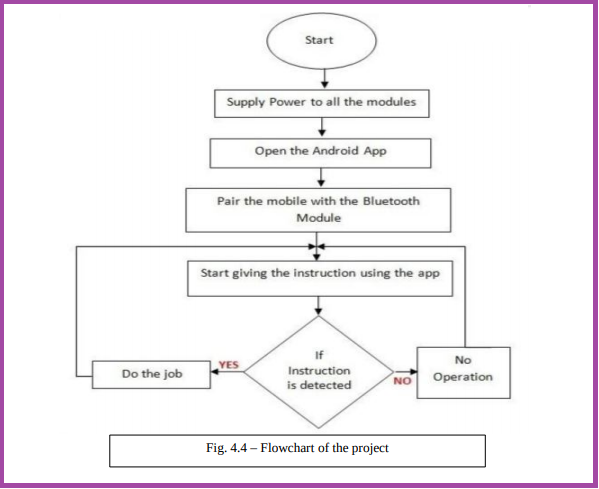
Working Principal :
Now we come to our main part our project Speech Recognized Intelligent Robot. In bellow you will see the flow chart of our project. From that you can understand how our project work
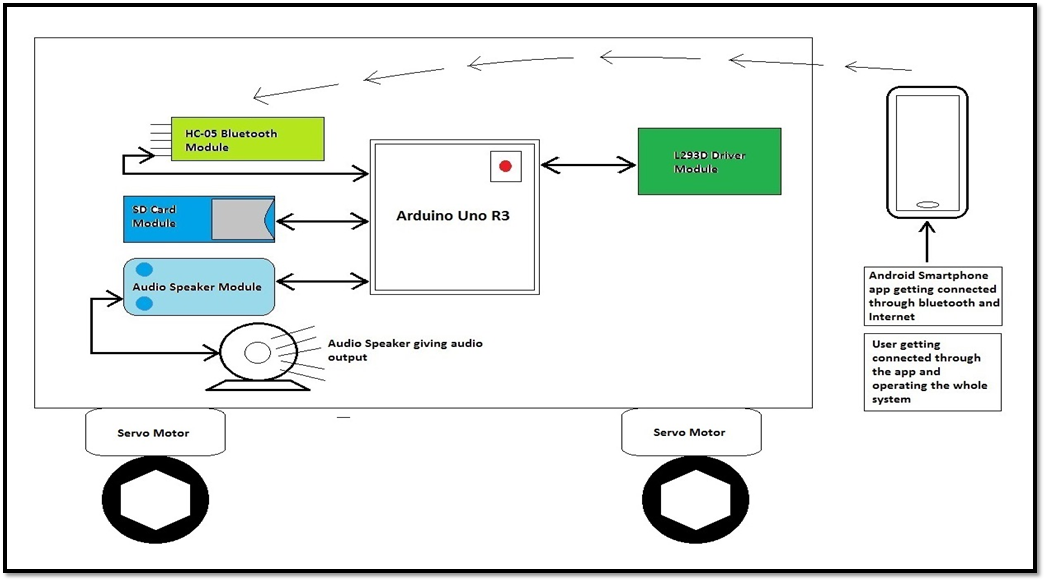
Hope you understand the process. Now you can see the working block diagram of our project.
Block diagram of Speech Recognized Intelligent Robot
// Author : Subham Dutta
// Date : 16-07-21
// Website : www.nbcafe.in
#include // need to include the SD library
//#define SD_ChipSelectPin53 //example uses hardware SS pin 53 on Mega2560
#define SD_ChipSelectPin4 //using digital pin 4 on arduinonano 328, can use other pins
#include // also need to include this library…
TMRpcmtmrpcm; // create an object for use in this sketch
void setup(){
pinMode(2, OUTPUT);
pinMode(3, OUTPUT);
pinMode(6, OUTPUT);
pinMode(7, OUTPUT);
tmrpcm.speakerPin = 9; //5,6,11 or 46 on Mega, 9 on Uno, Nano, etc
Serial.begin(9600);
if (!SD.begin(SD_ChipSelectPin)) { // see if the card is present and can be initialized:
Serial.println(“SD fail”);
return; // don’t do anything more if not
}
Serial.println(“SD okkkkkkkk”);
}
void loop(){
while(Serial.available()){
char ask = Serial.read();
Serial.println(‘ask’);
if(ask == ‘p’){ //send the letter p over the serial monitor to start playback
tmrpcm.setVolume(5);
tmrpcm.play(“p.wav”);
}
if(ask == ‘q’){ //send the letter p over the serial monitor to start playback
tmrpcm.setVolume(5);
tmrpcm.play(“cc.wav”);
}
if(ask == ‘a’){ //send the letter p over the serial monitor to start playback
tmrpcm.setVolume(5);
tmrpcm.play(“a.wav”);
}
if(ask == ‘b’){ //send the letter p over the serial monitor to start playback
tmrpcm.setVolume(5);
tmrpcm.play(“b.wav”);
}
if(ask == ‘c’){ //send the letter p over the serial monitor to start playback
tmrpcm.setVolume(5);
tmrpcm.play(“c.wav”);
}
if(ask == ‘d’){ //send the letter p over the serial monitor to start playback
tmrpcm.setVolume(5);
tmrpcm.play(“d.wav”);
}
if(ask == ‘e’){ //send the letter p over the serial monitor to start playback
tmrpcm.setVolume(5);
tmrpcm.play(“e.wav”);
}
if(ask == ‘f’){ //send the letter p over the serial monitor to start playback
tmrpcm.setVolume(5);
tmrpcm.play(“f.wav”);
}
if(ask == ‘g’){ //send the letter p over the serial monitor to start playback
tmrpcm.setVolume(5);
tmrpcm.play(“g.wav”);
}
if(ask == ‘h’){ //send the letter p over the serial monitor to start playback
tmrpcm.setVolume(5);
tmrpcm.play(“h.wav”);
}
if(ask == ‘i’){ //send the letter p over the serial monitor to start playback
tmrpcm.setVolume(5);
tmrpcm.play(“i.wav”);
}
if(ask == ‘j’){ //send the letter p over the serial monitor to start playback
tmrpcm.setVolume(5);
tmrpcm.play(“j.wav”);
}
if(ask == ‘k’){ //send the letter p over the serial monitor to start playback
tmrpcm.setVolume(5);
tmrpcm.play(“k.wav”);
}
if(ask == ‘l’){ //send the letter p over the serial monitor to start playback
tmrpcm.setVolume(5);
tmrpcm.play(“l.wav”);
}
if(ask == ‘m’){ //send the letter p over the serial monitor to start playback
tmrpcm.setVolume(5);
tmrpcm.play(“m.wav”);
}
if(ask == ‘n’){ //send the letter p over the serial monitor to start playback
tmrpcm.setVolume(5);
tmrpcm.play(“n.wav”);
}
if(ask == ‘o’){ //send the letter p over the serial monitor to start playback
tmrpcm.setVolume(5);
tmrpcm.play(“o.wav”);
}
if(ask == ‘r’){ //send the letter p over the serial monitor to start playback
tmrpcm.setVolume(5);
tmrpcm.play(“mr.wav”);
digitalWrite(2,HIGH);
digitalWrite(3,LOW);
digitalWrite(6,LOW);
digitalWrite(7,LOW);
tmrpcm.play(“smfr.wav”);}
if(ask == ‘s’){ //send the letter p over the serial monitor to start playback
tmrpcm.setVolume(5);
tmrpcm.play(“ml.wav”);
digitalWrite(7,HIGH);
digitalWrite(3,LOW);
digitalWrite(6,LOW);
digitalWrite(2,LOW);
if(ask == ‘y’){ //send the letter p over the serial monitor to start playback
tmrpcm.setVolume(5);
tmrpcm.play(“mf.wav”);
digitalWrite(2,HIGH);
digitalWrite(3,LOW);
digitalWrite(6,LOW);
digitalWrite(7,HIGH);
if(ask == ‘z’){ //send the letter p over the serial monitor to start playback
digitalWrite(2,LOW);
digitalWrite(3,LOW);
digitalWrite(6,LOW);
digitalWrite(7,LOW);
}
}
}
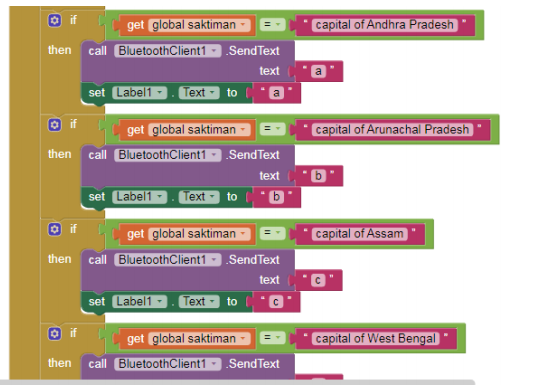
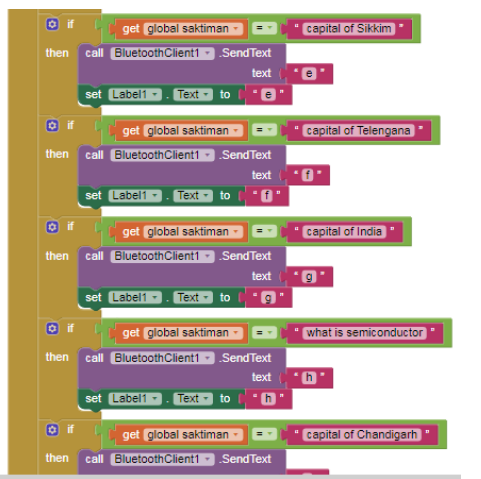
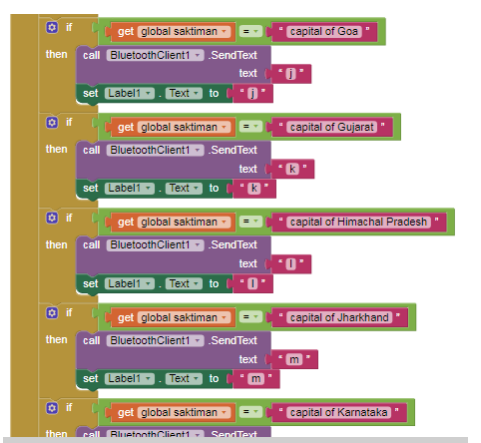
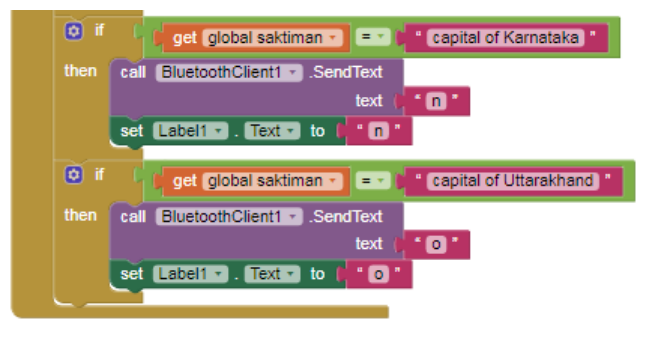
Now look on the android app making at Mit App Inventor 2. Here you see those blocks i used to make our own android app at Mit App Inventor.